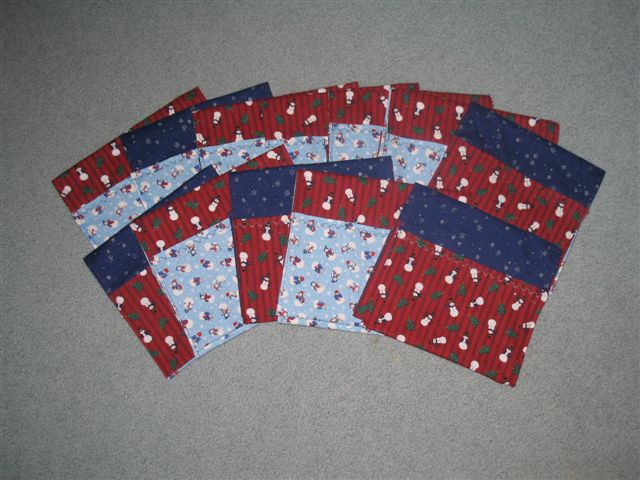
Materials needed:
Two fabrics that go together, Fabric #1 , which will be the fabric that shows when this laps over the bar of the walker, and Fabric #2, which will be the fabric that shows when the pockets are folded up. Prewash.
Cut each fabric 30 inches X 10 inches.
This is an approximate measurement. It can be changed for a wider or deeper Saddle Bag.
Fabric #2 can be two different fabrics pieced together, but don’t piece them exactly at the 15 inch mid-point.
Thread, either to blend in or to show for the top stitching.
Velcro 3 inches in length.
Optional:
Very thin batting or interfacing.
Embellishments or decorative stitching.
This is a good use for the type of inexpensive fabric that never gets soft when it is washed. If you use this kind of fabric, you can leave off the batting, saving time and money.
Directions:
Place Fabric #1 and Fabric #2 right sides together [if using batting, place fabrics right sides together and the batting on top of that.] Sew around the edges, ¼ to 3/8 inch seam allowance, leaving a large enough opening to turn the “pillowcase” right sides out.
Clip the points off the corners, turn right sides out. Press the seams. Press in the seam allowances of the opening and sew closed, by hand, or (HINT) glue them closed with light fabric glue.
Top stitch across the short ends, plain or decorative stitching. You could embellish the last three or so inches of each end of Fabric #2. A name could be embroidered on the fabric.
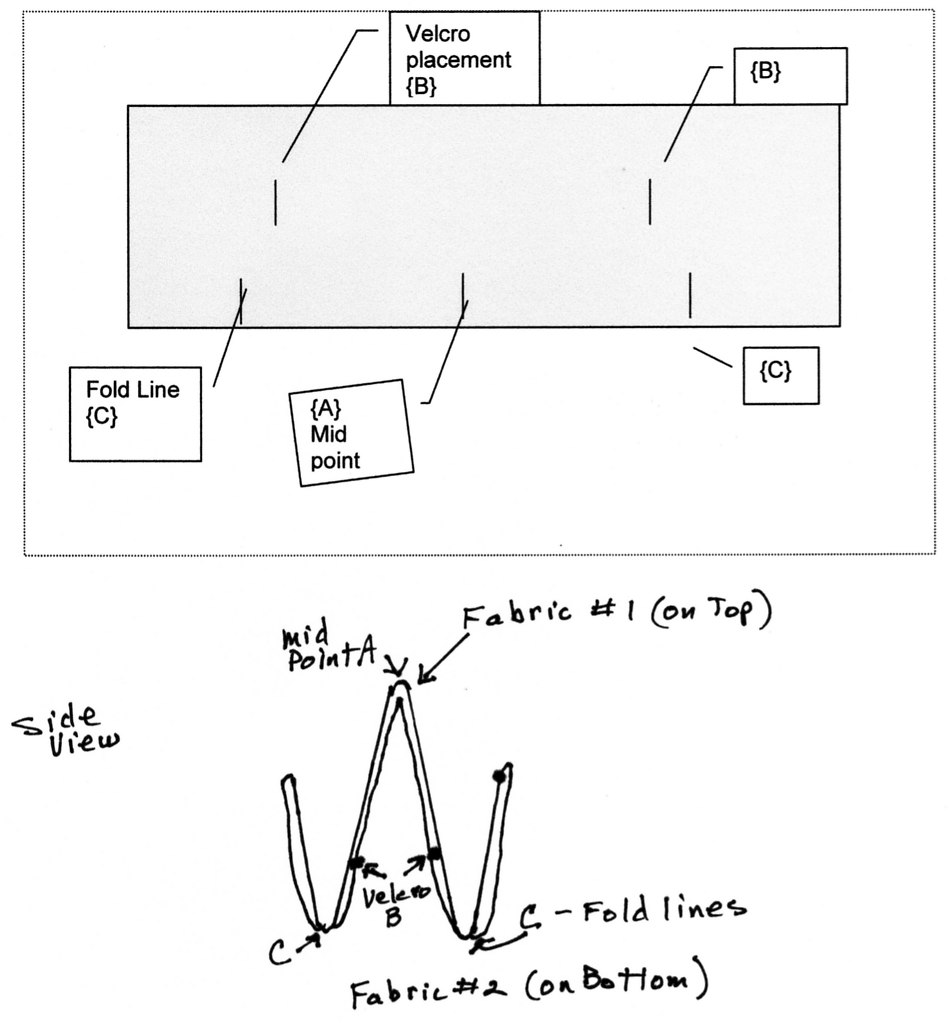
On Fabric #2, mark the mid point {A} of the fabric, along the long side. Measure 7 inches from the midpoint, toward each end. Mark. Separate the Velcro and place a three inch piece of Velcro at these points, but centered {B}, parallel to the ends of the Saddle Bag. Sew the Velcro on. [Another way to explain this is: the two velcro strips are to be placed 7" from either side of the midpoint, parallel to the short ends, and in the middle.]
(HINT) A blind hem foot works well for Velcro. Don’t worry about stitching through both fabrics since this stitching will be hidden when the pocket is folded up.
On the Fabric #1 side, measure and mark about 5 inches from each end {C}. Fold up the ends (short sides) at that mark. That forms the pockets.
Top Stitch around the Outside edge, with an extra few back stitches where the edge of the pockets meet the “saddle” part of the fabric to secure them. The top stitching holds the pockets in place and also acts to slightly stiffen the bottom of the pockets.


 We knew that something, probably a flying squirrel, was on the bird feeder. I turned out the lights, pulled up the curtain, and shot blind. Four flying squirrels! I wonder where they hide during the daylight when the red squirrels are eating at this "squirrel proof feeder."